|
最近,检索增强生成(Retrieval-Augmented Generation,简称 RAG)在人工智能和大模型领域中崭露头角,成为一种极具潜力的新范式。 RAG 将信息检索与文本生成相结合,通过引入外部知识源来提升大模型的表现。这种方法已在问答系统、对话系统以及内容生成等多种应用中展现出令人期待的成果。 在这篇文章中,作者将带你深入了解 RAG 的工作原理,并使用 Python 和 Ollama 从零构建一个简单的 RAG 系统。通过这个项目,你将掌握 RAG 系统的核心组成部分,并学会如何利用基础的编程概念实现它。可以说实用满满。 我们先从一个没有使用 RAG的简单聊天机器人说起: 这个聊天机器人可以根据训练数据回答常见问题,但它无法访问最新的信息或特定领域的知识。 举个现实例子:你问 ChatGPT——“我妈妈叫什么名字?”
 它当然回答不了,因为它无法访问外部信息,比如你的家庭成员资料。 要解决这个问题,我们需要给模型补充外部知识。比如在这个例子里,我们可以提供一份“家庭成员名单”作为外部知识来源。 RAG 系统的两个核心组成部分:RAG 的实现方式有多种,比如Graph RAG、Hybrid RAG、Hierarchical RAG等,我们会在文章结尾简单介绍。 下面我们来搭建一个简单的 RAG 系统,它能从预定义的数据集中检索信息,并基于检索结果生成回答。这个系统包括三个主要部分: Embedding 模型:一种预训练语言模型,用来把输入文本转换成向量,即能表示语义的数值形式。这些向量可以用来在数据集中查找相似内容。 向量数据库:用来存储知识及其对应的向量。常见的向量数据库包括 Qdrant、Pinecone、pgvector 等,但这里我们将从零实现一个简单的内存版数据库。 聊天机器人:根据检索结果生成回答的语言模型,可以是 Llama、Gemma 或 GPT 等。
构建 RAG 系统的第一步是索引。在这个阶段,我们需要把数据集(或文档)拆分成更小的片段(chunks),并为每个片段计算一个向量表示,方便后续快速检索。 不同应用场景下,片段大小会有所不同: 文档检索系统中,一个片段可以是一段文字或一句话; 对话系统中,一个片段可以是一轮对话。
索引完成后,每个片段和它对应的向量都会被存入向量数据库中。下图展示了索引阶段后,数据库中数据的大致结构示例: | |
|---|
| \[0.1, 0.04, -0.34, 0.21, ...\] | | \[-0.12, 0.03, 0.9, -0.1, ...\] | | \[-0.02, 0.6, -0.54, 0.03, ...\] | | |
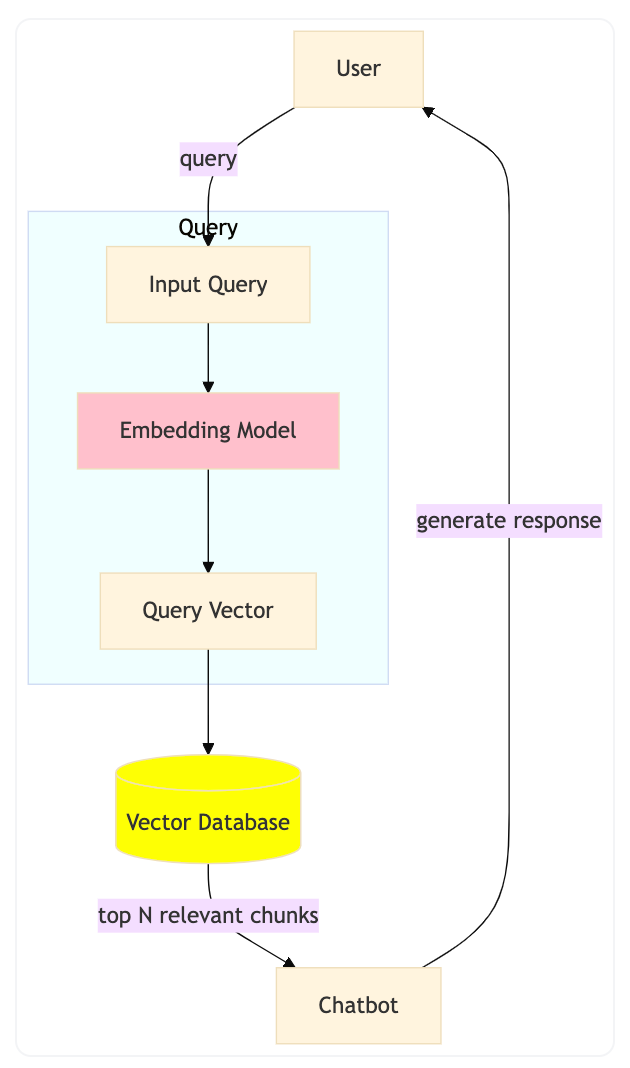
这些向量表示之后可以用来根据用户的查询检索相关信息。你可以把它想象成 SQL 语句里的WHERE条件,但不同的是,这里不是精确匹配文本,而是根据向量之间的语义相似度来查找最相关的片段。为了比较两个向量的相似度,我们可以使用余弦相似度(cosine similarity)、欧几里得距离(Euclidean distance)或其他距离度量方法。 在这个示例中,我们将使用余弦相似度。下面是向量 A 和向量 B 之间的余弦相似度公式: 如果你对上面的公式还不太熟悉,也不用担心——我们会在下一节中亲手实现它。 如下图所示,当用户Input Query时,系统会先将这个查询转换成一个Query Vector,然后将其与向量数据库中的所有向量进行比较,以找到最相关的文本片段(chunks)。 Vector Database返回的结果会包含与查询最相关的前 N 个片段,接下来Chatbot会基于这些片段生成最终的回答。
 在这个示例中,我们将用 Python 实现一个简单版本的 RAG 系统。 为了运行模型,我们会使用ollama—— 一款命令行工具,可以直接运行来自 Hugging Face 的模型。 使用 ollama,你不需要连接服务器或云服务,就能在自己的电脑上本地运行模型。 我们将使用以下两个模型: 至于数据集,我们会用一份关于 cat 的简单事实列表。在索引阶段,每一条事实都会被当作一个独立的文本片段。 首先,从官方网站 ollama.com安装ollama。 安装完成后,打开终端,运行以下命令来下载所需的模型: ollamapullhf.co/CompendiumLabs/bge-base-en-v1.5-ggufollamapullhf.co/bartowski/Llama-3.2-1B-Instruct-GGUF 如果你看到下面这个输出结果,那说明你的安装成功了: pullingmanifest...verifyingsha256digestwritingmanifestsuccess 在继续之前,为了在 Python 中使用ollama,我们还需要安装ollama的 Python 包: 接下来,创建一个 Python 脚本,并将数据集加载到内存中。这个数据集包含了一系列关于 cat 的事实,每条事实将在索引阶段作为一个片段使用。 你可以从这里下载示例数据集。下面是一个加载数据集的示例代码: dataset=[]withopen('cat-facts.txt','r')asfile:dataset=file.readlines()print(f'Loaded{len(dataset)}entries')现在,我们来实现向量数据库。 我们将使用ollama的 embedding 模型,将每个片段转换为向量表示,然后将片段及其对应的向量存入到一个列表中。 下面是一个计算给定文本向量表示的示例函数: importollamaEMBEDDING_MODEL='hf.co/CompendiumLabs/bge-base-en-v1.5-gguf'LANGUAGE_MODEL='hf.co/bartowski/Llama-3.2-1B-Instruct-GGUF'#EachelementintheVECTOR_DBwillbeatuple(chunk,embedding)#Theembeddingisalistoffloats,forexample:[0.1,0.04,-0.34,0.21,...]VECTOR_DB=[]defadd_chunk_to_database(chunk):embedding=ollama.embed(model=EMBEDDING_MODEL,input=chunk)['embeddings'][0]VECTOR_DB.append((chunk,embedding)) 在这个示例中,为了简单起见,我们将数据集中的每一行都视为一个片段。 fori,chunkinenumerate(dataset):add_chunk_to_database(chunk)print(f'Addedchunk{i+1}/{len(dataset)}tothedatabase')接下来,我们来实现检索函数。该函数接收一个查询,并根据余弦相似度返回与查询最相关的前 N 个片段。 可以理解为:两个向量的余弦相似度越高,它们在向量空间中就越接近,也就意味着它们在语义上越相似。 下面是一个计算两个向量余弦相似度的示例函数: defcosine_similarity(a,b):dot_product=sum([x*yforx,yinzip(a,b)])norm_a=sum([x**2forxina])**0.5norm_b=sum([x**2forxinb])**0.5returndot_product/(norm_a*norm_b) defretrieve(query,top_n=3):query_embedding=ollama.embed(model=EMBEDDING_MODEL,input=query)['embeddings'][0]#temporarylisttostore(chunk,similarity)pairssimilarities=[]forchunk,embeddinginVECTOR_DB:similarity=cosine_similarity(query_embedding,embedding)similarities.append((chunk,similarity))#sortbysimilarityindescendingorder,becausehighersimilaritymeansmorerelevantchunkssimilarities.sort(key=lambdax:x[1],reverse=True)#finally,returnthetopNmostrelevantchunksreturnsimilarities[:top_n]
在这一阶段,聊天机器人将根据上一步检索到的知识生成回答。具体做法是:将相关片段加入到提示语(prompt)中,然后将提示语作为聊天机器人的输入。 例如,可以这样构建一个提示语: input_query=input('Askmeaquestion:')retrieved_knowledge=retrieve(input_query)print('Retrievedknowledge:')forchunk,similarityinretrieved_knowledge:print(f'-(similarity:{similarity:.2f}){chunk}')instruction_prompt=f'''Youareahelpfulchatbot.Useonlythefollowingpiecesofcontexttoanswerthequestion.Don'tmakeupanynewinformation:{'\n'.join([f'-{chunk}'forchunk,similarityinretrieved_knowledge])}'''然后,我们使用ollama来生成回答。在这个示例中,我们将把instruction_prompt作为系统消息使用:stream=ollama.chat(model=LANGUAGE_MODEL,messages=[{'role':'system','content':instruction_prompt},{'role':'user','content':input_query},],stream=True,)#printtheresponsefromthechatbotinreal-timeprint('Chatbotresponse:')forchunkinstream:print(chunk['message']['content'],end='',flush=True)完整代码可以在此文件(https://huggingface.co/ngxson/demo_simple_rag_py/blob/main/demo.py)中找到。 运行代码的方法:将其保存为demo.py文件,然后执行以下命令: 现在,你可以向聊天机器人提问,它会根据从数据集中检索到的知识生成回答。Askmeaquestion:tellmeaboutcatspeedRetrievedchunks:...Chatbotresponse:Accordingtothegivencontext,catscantravelatapproximately31mph(49km)overashortdistance.Thisistheirtopspeed. 到目前为止,我们已经用一个小数据集实现了一个简单的 RAG 系统,但它仍然存在不少局限: 在实际应用中,RAG 的实现方式多种多样。以下是几种常见类型: RAG 的出现,让大模型能够更好地利用外部知识,显著提升了其准确性和实用性。 通过从零实现一个简单的 RAG 系统,我们理解了embedding(向量表示)、retrieval(检索)和generation(生成)的核心概念。 尽管这个实现还很基础,但它展现了支撑实际生产环境中高级 RAG 系统的底层原理。 未来,RAG 的改进空间仍然广阔:从优化向量数据库的性能,到探索 Graph RAG、Hybrid RAG 等新架构,这一领域仍在快速演进中。RAG 将继续作为连接语言模型和外部知识的关键技术,帮助 AI 在保持生成能力的同时,变得更聪明、更可靠。 ingFang SC", system-ui, -apple-system, BlinkMacSystemFont, "Helvetica Neue", "Hiragino Sans GB", "Microsoft YaHei UI", "Microsoft YaHei", Arial, sans-serif;font-size: 17px;font-style: normal;font-variant-ligatures: normal;font-variant-caps: normal;font-weight: 400;letter-spacing: 0.544px;orphans: 2;text-indent: 0px;text-transform: none;widows: 2;word-spacing: 0px;-webkit-text-stroke-width: 0px;white-space: normal;text-decoration-thickness: initial;text-decoration-style: initial;text-decoration-color: initial;background-color: rgb(255, 255, 255);text-align: center;">张其来,徐思琪 | 著ingFang SC", system-ui, -apple-system, BlinkMacSystemFont, "Helvetica Neue", "Hiragino Sans GB", "Microsoft YaHei UI", "Microsoft YaHei", Arial, sans-serif;font-size: 17px;font-style: normal;font-variant-ligatures: normal;font-variant-caps: normal;font-weight: 400;letter-spacing: 0.544px;orphans: 2;text-align: justify;text-indent: 0px;text-transform: none;widows: 2;word-spacing: 0px;-webkit-text-stroke-width: 0px;white-space: normal;text-decoration-thickness: initial;text-decoration-style: initial;text-decoration-color: initial;background-color: rgb(255, 255, 255);">一本注重 RAG 上手实践的书,没有堆术语,而是把整套 RAG 技术拆解得明明白白。ingFang SC", system-ui, -apple-system, BlinkMacSystemFont, "Helvetica Neue", "Hiragino Sans GB", "Microsoft YaHei UI", "Microsoft YaHei", Arial, sans-serif;font-size: 17px;font-style: normal;font-variant-ligatures: normal;font-variant-caps: normal;font-weight: 400;letter-spacing: 0.544px;orphans: 2;text-align: justify;text-indent: 0px;text-transform: none;widows: 2;word-spacing: 0px;-webkit-text-stroke-width: 0px;white-space: normal;text-decoration-thickness: initial;text-decoration-style: initial;text-decoration-color: initial;background-color: rgb(255, 255, 255);">全书共 7 章内容,作者从背景原理讲起,到怎么搭框架、怎么处理数据、怎么做检索、生成、优化,每一块都有图、有例子,逻辑也特别清晰。甚至最后还贴心地加了个完整实战项目,让你从头跑一遍系统都不带卡壳的。ingFang SC", system-ui, -apple-system, BlinkMacSystemFont, "Helvetica Neue", "Hiragino Sans GB", "Microsoft YaHei UI", "Microsoft YaHei", Arial, sans-serif;font-size: 17px;font-style: normal;font-variant-ligatures: normal;font-variant-caps: normal;font-weight: 400;letter-spacing: 0.544px;orphans: 2;text-align: justify;text-indent: 0px;text-transform: none;widows: 2;word-spacing: 0px;-webkit-text-stroke-width: 0px;white-space: normal;text-decoration-thickness: initial;text-decoration-style: initial;text-decoration-color: initial;background-color: rgb(255, 255, 255);">如果你想把RAG 真正用起来,这本书一定不要错过! |