在本文中,梳理了近期 (24年7月前)部分 MOE 大模型的关键信息,包括它们的主要特点、亮点以及相关资源链接。涉及模型 Mixtral 8x7B,Mixtral 8x22B,DeepSeek-MoE,Qwen1.5-MoE,DeepSeek-V2。
原文:https://zhuanlan.zhihu.com/p/712676995
混合专家模型的 Transformer 模型
对于 MOE 的基础,相比 dense model,MOE 的预训练速度更快,推理速度更快,但需要大量的显存。此外,MOE 的训练也有一些独有的 tips,详细的 MOE 混合专家模型基础,推荐参考:混合专家模型基础
对于一些经典的 MOE 架构模型,可以参考:详解MoE模型的前世今生
Mixtral 8*7B
论文:https://arxiv.org/abs/2401.04088
huggingface模型权重:https://huggingface.co/mistralai/Mixtral-8x7B-Instruct-v0.1
官方博客:https://mistral.ai/news/mixtral-of-experts/
huggingface模型代码:https://github.com/huggingface/transformers/blob/main/src/transformers/models/mixtral/modeling_mixtral.py
官方给出的评分来看,mixtral 8*7 和 GPT3.5 有的一比。
模型大小:8 个 expert MLP 层,一共45B 大小。
训练:除了预训练外,Mixtral MOE 后续还开源了一个经过 SFT + DPO 微调的版本。

- 架构:Mixtral 的 MOE 架构类似于,在 MoE 模型中,只有 FFN 层被视为独立的专家,而模型的其他参数是共享的。大致参数为:
对 moe 架构不太了解的朋友,可以参考这篇博客 混合专家模型基础(推荐)。
参考 huggingface 中的 mixtral 和 mistral 实现对比,差异在于 mixtral 中将传统 transformer decoder layer 中的 FFN 替换为了 block_sparse_moe。

主要逻辑为:
其中 为专家对应的网络,具体展示为下面 huggingface 实现中的 MixtralBlockSparseTop2MLP。mixtral 中采用了 8 个 expert,每次推理使用选取 top 2 的 expert 进行推理。比如输入一句话 你好,今天,那么我们每个 token 都会选出 top 2 的 expert 来负责这个 token 的预测,因此在推理 你好,今天 时,有概率所有 expert 都会参与到计算当中,具体可以参考 MixtralSparseMoeBlock 的实现。

mixtral 论文中提到专家分配在不同主题(如ArXiv论文、生物学和哲学文档)中没有明显的模式,只有在DM数学中显示出边际上的差异,这可能是由于其数据集的合成性质和有限的自然语言覆盖范围所致。router 在某些句法结构上表现出一定的结构化行为(比如 python 的 self 等),同时连续标记通常被分配给相同的专家。
- huggingface 中的 mixtral 核心代码:
classMixtralDecoderLayer(nn.Module):
def__init__(self,config:MixtralConfig,layer_idx:int):
super().__init__()
self.hidden_size=config.hidden_size
self.self_attn=MIXTRAL_ATTENTION_CLASSES[config._attn_implementation](config,layer_idx)

self.block_sparse_moe=MixtralSparseMoeBlock(config)
self.input_layernorm=MixtralRMSNorm(config.hidden_size,eps=config.rms_norm_eps)
self.post_attention_layernorm=MixtralRMSNorm(config.hidden_size,eps=config.rms_norm_eps)

defforward(
hidden_states:torch.Tensor,
attention_mask:Optional[torch.Tensor]=None,
#此处省略参数..
)->Tuple[torch.FloatTensor,Optional[Tuple[torch.FloatTensor,torch.FloatTensor]]]:

residual=hidden_states
hidden_states=self.input_layernorm(hidden_states)
hidden_states,self_attn_weights,present_key_value=self.self_attn(
#此处省略参数
)
hidden_states=residual+hidden_states
residual=hidden_states
hidden_states=self.post_attention_layernorm(hidden_states)

# Mixtral 将原本的 hidden_states = self.FFN(hidden_states)替换为了:
hidden_states,router_logits=self.block_sparse_moe(hidden_states)

hidden_states=residual+hidden_states
outputs=(hidden_states,)

returnoutputs
huggingface 中 block_sparse_moe 的实现(省略部分次要代码):
classMixtralSparseMoeBlock(nn.Module):
def__init__(self,config):
super().__init__()
self.hidden_dim=config.hidden_size
self.ffn_dim=config.intermediate_size
self.num_experts=config.num_local_experts
self.top_k=config.num_experts_per_tok

self.gate=nn.Linear(self.hidden_dim,self.num_experts,bias=False)
self.experts=nn.ModuleList([MixtralBlockSparseTop2MLP(config)for_inrange(self.num_experts)])

self.jitter_noise=config.router_jitter_noise

defforward(self,hidden_states:torch.Tensor)->torch.Tensor:
batch_size,sequence_length,hidden_dim=hidden_states.shape
hidden_states=hidden_states.view(-1,hidden_dim)
router_logits=self.gate(hidden_states)#(batch*sequence_length,n_experts)

routing_weights=F.softmax(router_logits,dim=1,dtype=torch.float)
routing_weights,selected_experts=torch.topk(routing_weights,self.top_k,dim=-1)
routing_weights/=routing_weights.sum(dim=-1,keepdim=True)
#wecastbacktotheinputdtype
routing_weights=routing_weights.to(hidden_states.dtype)

final_hidden_states=torch.zeros(
(batch_size*sequence_length,hidden_dim),dtype=hidden_states.dtype,device=hidden_states.device
)

#Onehotencodetheselectedexpertstocreateanexpertmask
#thiswillbeusedtoeasilyindexwhichexpertisgoingtobesollicitated
expert_mask=torch.nn.functional.one_hot(selected_experts,num_classes=self.num_experts).permute(2,1,0)

#Loopoverallavailableexpertsinthemodelandperformthecomputationoneachexpert
forexpert_idxinrange(self.num_experts):
expert_layer=self.experts[expert_idx]
idx,top_x=torch.where(expert_mask[expert_idx])

#Indexthecorrecthiddenstatesandcomputetheexperthiddenstatefor
#thecurrentexpert.Weneedtomakesuretomultiplytheoutputhidden
#statesby`routing_weights`onthecorrespondingtokens(top-1andtop-2)

current_state=hidden_states[None,top_x].reshape(-1,hidden_dim)
#current_state:shape(n_i,hidden_dim)
#所有current_state的长度n总和为batch*sequence_length
current_hidden_states=expert_layer(current_state)*routing_weights[top_x,idx,None]

#However`index_add_`onlysupporttorchtensorsforindexingsowe'lluse
#the`top_x`tensorhere.
final_hidden_states.index_add_(0,top_x,current_hidden_states.to(hidden_states.dtype))
final_hidden_states=final_hidden_states.reshape(batch_size,sequence_length,hidden_dim)
returnfinal_hidden_states,router_logits
其中:MixtralBlockSparseTop2MLP 长这样:
classMixtralBlockSparseTop2MLP(nn.Module):
def__init__(self,config:MixtralConfig):
super().__init__()
self.ffn_dim=config.intermediate_size
self.hidden_dim=config.hidden_size

self.w1=nn.Linear(self.hidden_dim,self.ffn_dim,bias=False)
self.w2=nn.Linear(self.ffn_dim,self.hidden_dim,bias=False)
self.w3=nn.Linear(self.hidden_dim,self.ffn_dim,bias=False)

self.act_fn=ACT2FN[config.hidden_act]

defforward(self,hidden_states):
current_hidden_states=self.act_fn(self.w1(hidden_states))*self.w3(hidden_states)
current_hidden_states=self.w2(current_hidden_states)
returncurrent_hidden_states
根据模型参数量 45B 来推理的话,如果用 fp16 的话推理的话,得需要至少 90GB 以上的显存,如果用 4 bit的话,30GB 显存就够了。量化的生成速度,可以参考下面 redis 中的评论,大致为 :
| 推理精度 | 设备 | 速度 tokens/s |
|---|
| Q4_K_M | 单卡 4090 + 7950X3D | 20 |
| Q4_K_M | 2 x 3090 | 48.26 |
redis:https://www.reddit.com/r/LocalLLaMA/comments/18jslmf/tokens_per_second_mistral_8x7b_performance/
如果有 100+GB 以上显存,可以用 vllm 快速搭建测试 api:
dockerrun--gpusall\
-eHF_TOKEN=$HF_TOKEN-p8000:8000\
ghcr.io/mistralai/mistral-src/vllm:latest\
--host0.0.0.0\
--modelmistralai/Mixtral-8x7B-Instruct-v0.1\
--tensor-parallel-size2#100+GB显存\
--load-formatpt#neededsinceboth`pt`and`safetensors`areavailable
NVIDIA 的 TensorRT-LLM 博客中发出了对 Mixtral 8*7B 的吞吐量 benchmark (using input and output sequence lengths of 128):

文中没有给出当 sequence lengths 最大时候的吞吐量,但根据上图数据,可以猜测 2个 H100 部署 8*7B 正常服务用户时,平均吞吐量应该可以大于 7500Tokens/秒,根据 H100 的功耗计算电费成本的话,生成 1M token 需要耗约为 0.02 度电。
DeepSeek-MoE
github:https://github.com/deepseek-ai/DeepSeek-MoE
论文:https://arxiv.org/pdf/2401.06066
- 训练:整个模型在 2T 的中英文预料上训练,实现了和 DeekSeek 7B 及 LlaMA 2 7B 差不都的效果。
- 模型效果: DeepSeekMoE 16B 推理时候,只用到了2.8B 的参数,整体的 FLOPs 是 LlaMA 2 7B 的 39.6%;推理速度更快的同时,效果也不差。

- 架构:DeepSeekMoE 16B 主要亮点在于 fine-grained expert segmentation 和 shared experts isolation.

Fine-grained Expert Segmentation
如上图B,DeepSeek-MoE 在减少了每个 expert FFN intermediate hidden dimension 的同时,增加激活的 expert 的数量,依次保证总体激活的 expert 的参数量一致。DeepSeekMoE 论文种认为,组合数量的提升,有利于 gate 更准确地选择 expert。
如当我们有 16 个 expert,然后选 top 2 进行推理时,activate expert 的组合数量有 种组合,但当将每个 expert 参数缩小 4 倍,expert 个数增加为 64 时,选取 top 8 进行推理时, activate expert 的组合书来给你就有 种。
Shared Expert Isolation
如上图C,设立一部分 Shared Expert,每次推理的时候都会激活。
Qwen1.5-MoE
官方博客:https://qwenlm.github.io/zh/blog/qwen-moe/
github:https://github.com/QwenLM/Qwen2
huggingface权重:https://huggingface.co/Qwen/Qwen1.5-MoE-A2.7B-Chat
- 架构重点: 类似于 DeepSeek-MoE,Qwen1.5-MoE 也尝试了 Finegrained experts,整个模型总共设计了 64 个 expert;而后在 routing 机制种也尝试了 Shared Expert Isolation :采用了 4个总是被激活的共享expert和每次只激活其中4个的60个routing expert。
- 训练:官方博客种表示:从零开始训练MoE模型可能效率低下,且难以提升至预期的最优性能水平。因此,Qwen1.5-MoE 首先利用已有的Qwen-1.8B,将其改造为Q wen1.5-MoE-A2.7B。此外,在初始化阶段引入随机性可以显著加快收敛速度,并在整个预训练过程中带来更好的整体性能表现。
- 模型效果:模型在推理时,总的激活参数为 2.7B。但实现的效果也不错:
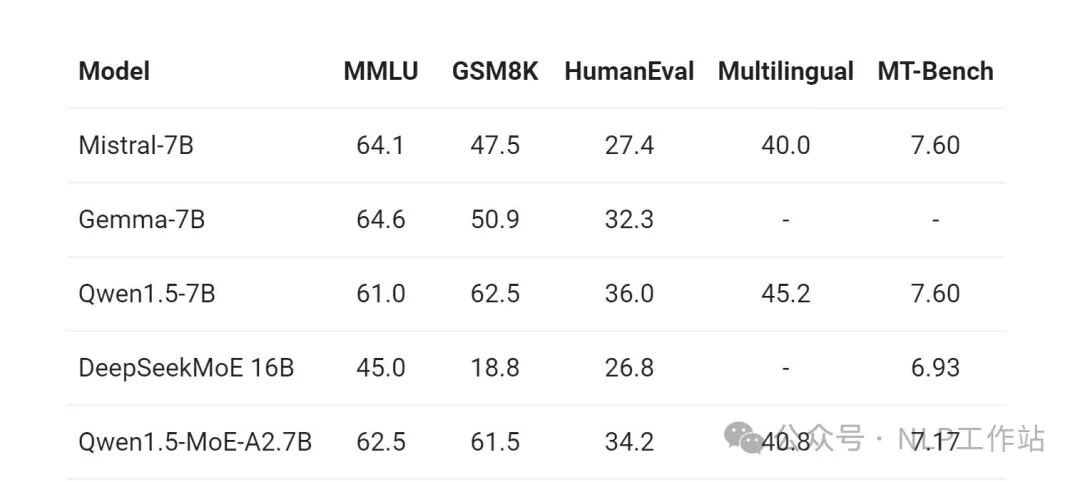
官方博客中发布了采用 vllm 部署时候的性能(单个NVIDIA A100-80G GPU 部署 Qwen1.5-7B和Qwen1.5-MoE-A2.7B):

看来 MoE 架构在不牺牲生成质量的情况下,的确可以极大提高吞吐量,降低大模型生成成本。
DeepSeek-V2
github:https://github.com/deepseek-ai/DeepSeek-V2
论文:https://arxiv.org/abs/2405.04434
权重下载:https://huggingface.co/collections/deepseek-ai/deepseek-v2-669a1c8b8f2dbc203fbd7746
huggingface模型代码:https://huggingface.co/deepseek-ai/DeepSeek-V2-Chat-0628/blob/main/modeling_deepseek.py
DeepSeek-V2 文中推出了 DeepSeek-V2-Lite 与 DeepSeek-V2 一小一大 2个版本。
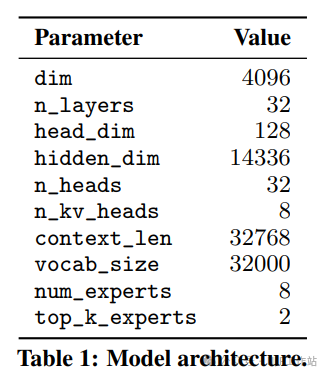
模型大小: DeepSeek-V2 整个模型有 236B 参数,其中推理激活参数为 21B。具体的架构参数可以查看:huggingface DeepSeek V2 config
推理速度:
DeepSeek V2 首先对模型进行了 KV Cache 量化,将参数转换为了 FP8。在单机 8卡 H800 的节点上部署 DeepSeek-V2,可以达到约 50K tokens/秒 的吞吐量

推理效果,中文水平更强一些,英文水平于 Mixtral 8*22B 有的一比:

- 模型架构重点:其中,架构采用了 MLA 取代 MHA,同时 MOE 架构采用了 DeepSeekMoE 的 fine-grained expert segmentation 和 shared experts isolation。整体的 DeepSeek Layer 架构如下:
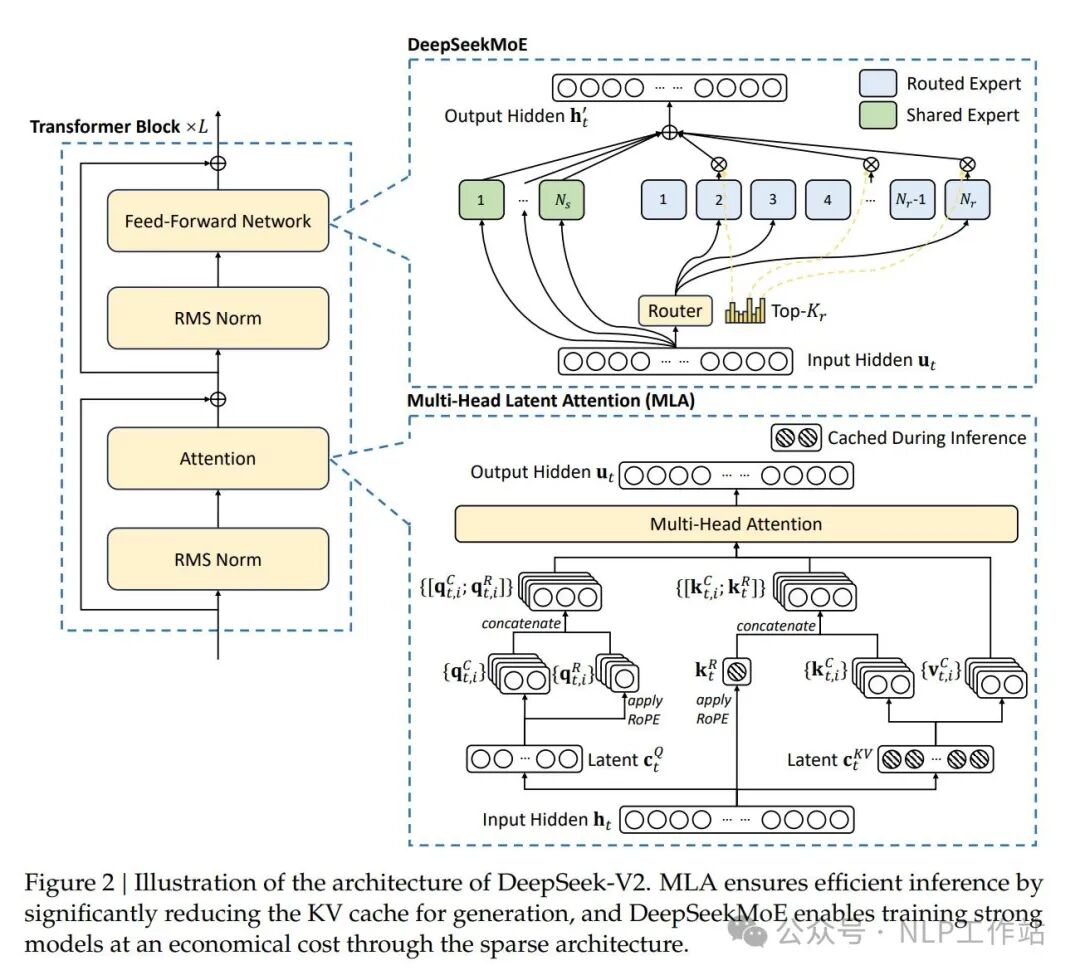
如上图展示的,DeepSeek-V2同样采用了 DeepSeekMoE 的策略,其中有 2 个 shared experts , 160 个 routed experts(每次只激活 6 个)
- Multi-Head Latent Attention
DeepSeek-V2 中着重讲了这一部分的优化。

Low-Rank Key-Value Joint Compression
为了减少 KV cache,MLA 提出将 k, v 的计算方式变为:
其中,
q 的计算方法变为:
其中,
因此,k,v 均从 进一步计算得来。在推理时候,传统 MHA 需要 cache ,但通过以上变化后,只需要 cache 即可。这样, 点积就变成了。
推理过程中,可以合并 ,以此达到减少 cache 同时,不会增加太多的计算量。
Decoupled Rotary Position Embedding
以上方案的一个问题是,不兼容 RoPE。由于 RoPE 的存在,
不再是单纯的 ,而是需要内积上相对位置矩阵 ,因此就无法简单得合并 。
MLA 采用了以下 decoupled RoPE 方案:
大概思路是,在原先的 qk 中,增加几个维度,用来注入 RoPE 位置信息,比较值得注意的是,k 新增加的维度 是所有 head 共享的。其中,, , 因此,q,k 的维度增加到了 。
更深入的 MLA 解读,可以参考:缓存与效果的极限拉扯:从MHA、MQA、GQA到MLA 或 deepseek v2 原论文。
文中给出了 MLA 与 MHA, GQA 的效果对比:
MLA 的 KV 的 cache 数量比 MHA, GQA 少了不少。
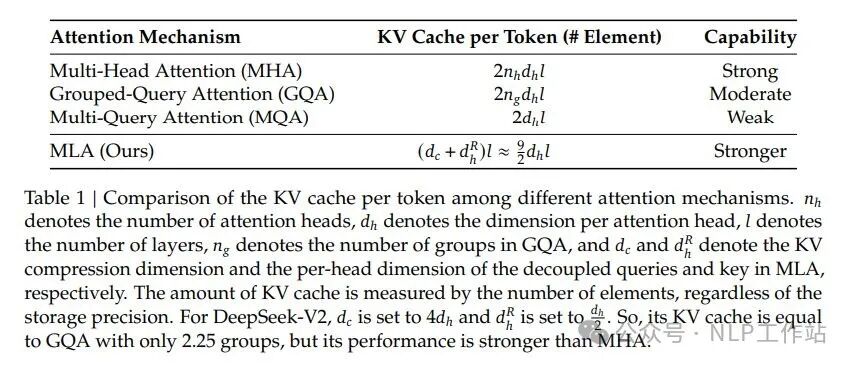
MLA KV cache 比 MHA 小的同时,效果也不会太差。

- 预训练: 相比于 DeepSeek 67B,DeepSeek-V2 训练集中有更多的中文数据,同时 DeepSeek V2 对数据过滤算法进行了改进,包括筛除有争议的内容等;DeepSeek V2 使用于 DeepSeek 67B 同样的 tokenizer,vocab size 为 100k,预训练语料约有 8.1T tokens,其中中文比英文多了 12%。整个预训练花费了172.8K GPU hours 的算力。
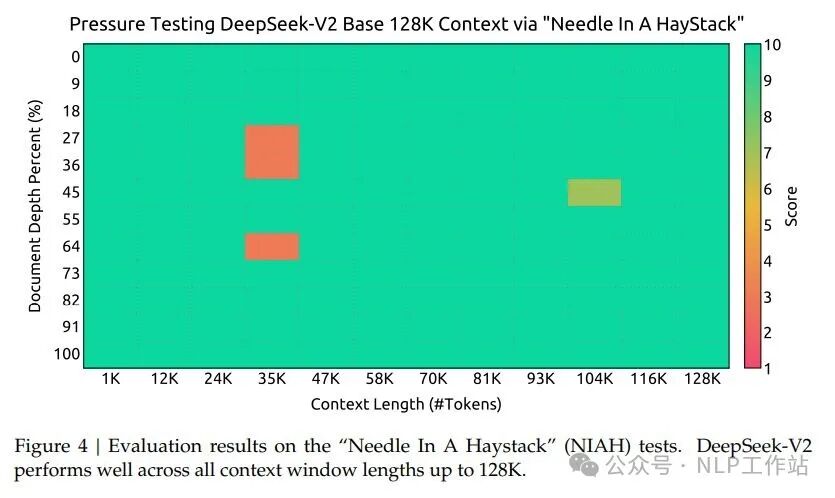
- 超长上下文: 在适配了 Yarn 之后,额外在 32k 的数据集上训练了 1000 steps,batch size 为 576。文中表示,尽管是在 32K 数据集上训练,但在 128K 的大海捞针测试中,模型表现也不错:
- SFT:在包含了 1.5M 组训练实例的数据集上,微调了 2 个 epoch。
- RLHF: 采用了 GRPO 来节省 RL 训练的成本,主要是将 PPO 过程中的 advantage 替换成了 ,因此在 RLHF 过程中就不需要 Value model 了。具体算法如下:
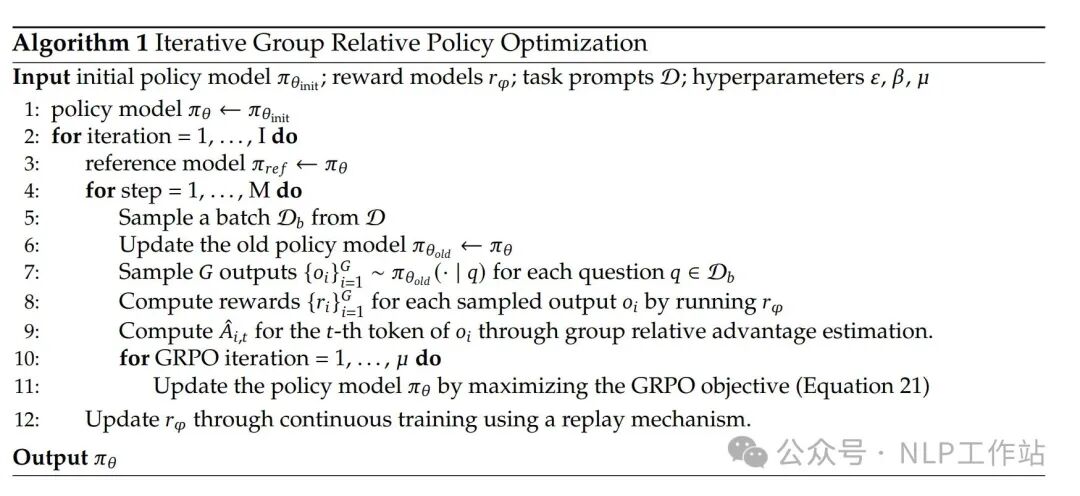
在 RLHF 训练过程中,采取了 2 阶段训练。首先进行了 reasoning alignment,而后进行 human preference alignment。
更多训练细节欢迎参考 DeepSeek-V2 论文
Mixtral 8*22B
官方博客:https://mistral.ai/news/mixtral-8x22b/
huggingface开源模型:https://huggingface.co/mistralai/Mixtral-8x22B-Instruct-v0.1
- 架构:架构与 mixtral 8*7B 架构一样,在 huggingface 中使用的都是
MixtralForCausalLM ,但 22B 的各方面参数大一点,比较特别的是 context window 从 32k 升级到了 65k, vocab_size 也更大一些。 - 支持 function calling,不过好像没有透露具体的 function calling 训练细节。
- 数学和 coding 能力明显超越 llama2 70B

Mistral 团队开源的模型,都比较注重 coding 和 math 的能力,Mixtral 系列的模型在这方便表现也是比较好: