|
ingFang SC", Cambria, Cochin, Georgia, Times, "Times New Roman", serif;letter-spacing: normal;text-wrap: wrap;background-color: rgb(255, 255, 255);">一、基础信息ingFang SC", Cambria, Cochin, Georgia, Times, "Times New Roman", serif;font-size: 16px;letter-spacing: normal;text-wrap: wrap;background-color: rgb(255, 255, 255);" class="list-paddingleft-1">ingFang SC", Cambria, Cochin, Georgia, Times, "Times New Roman", serif;letter-spacing: normal;text-wrap: wrap;background-color: rgb(255, 255, 255);">二、软件信息ingFang SC", Cambria, Cochin, Georgia, Times, "Times New Roman", serif;letter-spacing: normal;text-wrap: wrap;background-color: rgb(255, 255, 255);">Python: 3.10ingFang SC", Cambria, Cochin, Georgia, Times, "Times New Roman", serif;letter-spacing: normal;text-wrap: wrap;background-color: rgb(255, 255, 255);">Pytorch:2.3.0ingFang SC", Cambria, Cochin, Georgia, Times, "Times New Roman", serif;letter-spacing: normal;text-wrap: wrap;background-color: rgb(255, 255, 255);">Transformers:4.43.0ingFang SC", Cambria, Cochin, Georgia, Times, "Times New Roman", serif;letter-spacing: normal;text-wrap: wrap;background-color: rgb(255, 255, 255);">vLLM:0.5.1ingFang SC", Cambria, Cochin, Georgia, Times, "Times New Roman", serif;letter-spacing: normal;text-wrap: wrap;background-color: rgb(255, 255, 255);">cuda:12.2ingFang SC", Cambria, Cochin, Georgia, Times, "Times New Roman", serif;letter-spacing: normal;text-wrap: wrap;background-color: rgb(255, 255, 255);">模型 Wen2-72B-InstructingFang SC", Cambria, Cochin, Georgia, Times, "Times New Roman", serif;letter-spacing: normal;text-wrap: wrap;background-color: rgb(255, 255, 255);">三、安装步骤 Wen2-72B-InstructingFang SC", Cambria, Cochin, Georgia, Times, "Times New Roman", serif;letter-spacing: normal;text-wrap: wrap;background-color: rgb(255, 255, 255);">三、安装步骤1、安装CondaConda 是一个开源的包管理系统和环境管理系统,旨在简化软件包的安装、配置和使用 对于Python环境的部署,能够非常方便的切换环境。 可以通过conda官网链接下载安装:https://www.anaconda.com/download#downloads #下载
wgethttps://repo.anaconda.com/archive/Anaconda3-2023.09-0-Linux-x86_64.sh
#安装
bashAnaconda3-2023.09-0-Linux-x86_64.sh
#配置环境变量
echo'exportPATH="/path/to/anaconda3/bin PATH"'>>~/.bashrc PATH"'>>~/.bashrc
source~/.bashrc
安装完成后,通过命令验证安装是否成功 conda--version
安装完成之后,可以配置镜像源,方便快速下载依赖包 #配置源
condaconfig--addchannelshttps://mirrors.tuna.tsinghua.edu.cn/anaconda/pkgs/free/
condaconfig--addchannelshttps://mirrors.tuna.tsinghua.edu.cn/anaconda/pkgs/main/
condaconfig--setshow_channel_urlsyes
condaconfig--addchannelshttps://mirrors.tuna.tsinghua.edu.cn/anaconda/cloud/conda-forge/
condaconfig--addchannelshttps://mirrors.tuna.tsinghua.edu.cn/anaconda/cloud/msys2/
condaconfig--addchannelshttps://mirrors.tuna.tsinghua.edu.cn/anaconda/cloud/bioconda/
condaconfig--addchannelshttps://mirrors.tuna.tsinghua.edu.cn/anaconda/cloud/menpo/
condaconfig--addchannelshttps://mirrors.tuna.tsinghua.edu.cn/anaconda/cloud/pytorch/
conda的相关命令 #指定虚拟环境名称为llm,python版本是3.10
condacreate--namellmpython=3.10
#激活conda新环境
condaactivatellm
#查看当前环境列表
condaenvlist
2、下载QWen2-72B-Instruct模型Huggingface:https://huggingface.co/Qwen/Qwen2-72B-Instruct ModelScope:https://modelscope.cn/models/qwen/Qwen2-72B-Instruct 两个地址都可以下载,下载完成后,将模型文件存放在服务器上。 ⚠️ 注意服务器的磁盘空间。
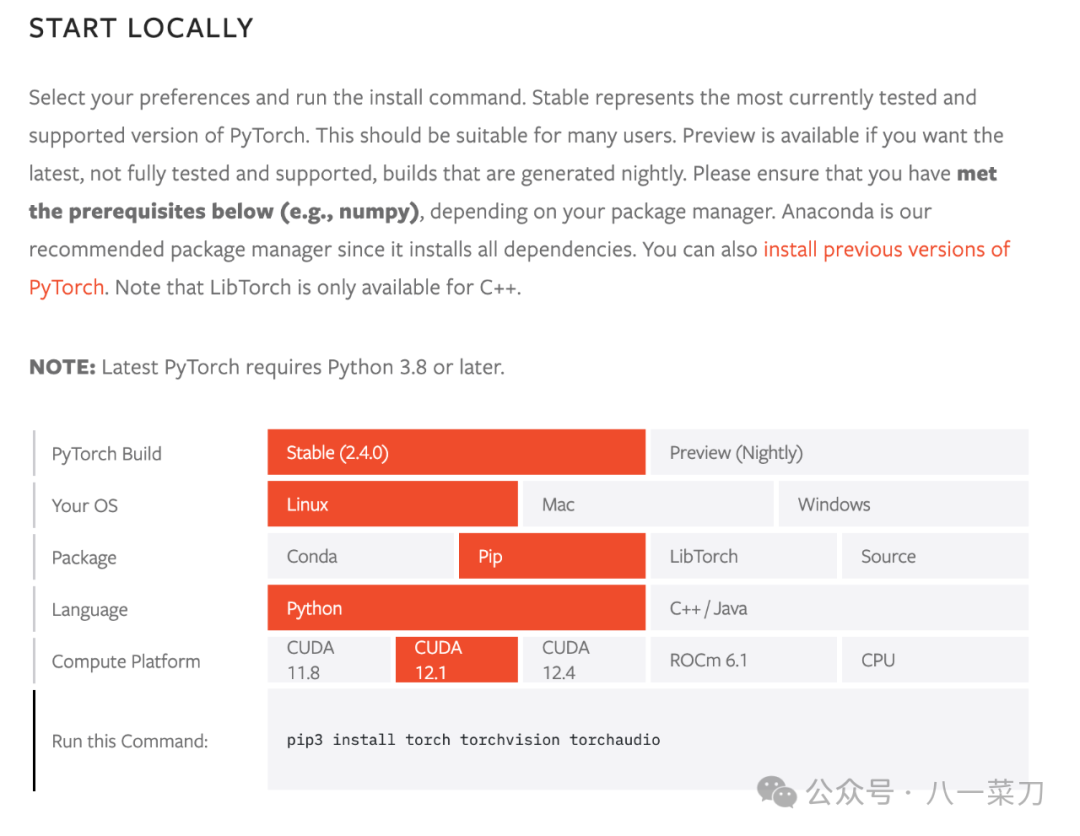
3、安装Pytorch等环境依赖信息⚠️ 在安装Pytorch时,需要保证和cuda驱动版本保持一致,不然会出现各种莫名其妙的问题 版本选择参考:https://pytorch.org/get-started/locally/ 通过conda创建一个新的环境,然后切换后安装依赖包
4、 安装vLLMvLLM框架是一个高效的大语言模型推理和部署服务系统,具备以下特性:
- 高效的内存管理:通过
PagedAttention算法,vLLM实现了对KV缓存的高效管理,减少了内存浪费,优化了模型的运行效率。 - 高吞吐量:
vLLM支持异步处理和连续批处理请求,显著提高了模型推理的吞吐量,加速了文本生成和处理速度。 - 易用性:
vLLM与HuggingFace模型无缝集成,支持多种流行的大型语言模型,简化了模型部署和推理的过程。兼容OpenAI的API服务器。 - 分布式推理:框架支持在多
GPU环境中进行分布式推理,通过模型并行策略和高效的数据通信,提升了处理大型模型的能力。 - 开源共享:
vLLM由于其开源的属性,拥有活跃的社区支持,这也便于开发者贡献和改进,共同推动技术发展。
GitHub:https://github.com/vllm-project/vllm 文档:https://docs.vllm.ai/en/latest/ 在通过conda创建了初始环境后,可以直接通过pip进行安装 pipinstallvllm
更多的安装方式,可以参考官网文档:https://docs.vllm.ai/en/stable/getting_started/installation.html 5、模型验证可以通过一个python脚本来验证当前的模型是否可用 脚本如下: #test.py
fromvllmimportLLM,SamplingParams
fromtransformersimportAutoTokenizer
importos
importjson
defget_completion(prompts,model,tokenizer=None,max_tokens=512,temperature=0.8,top_p=0.95,max_model_len=2048):
stop_token_ids=[]
#创建采样参数。temperature 控制生成文本的多样性,top_p 控制核心采样的概率
sampling_params=SamplingParams(temperature=temperature,top_p=top_p,max_tokens=max_tokens,stop_token_ids=stop_token_ids)
#初始化vLLM推理引擎
llm=LLM(model=model,tokenizer=tokenizer,max_model_len=max_model_len,trust_remote_code=True)
outputs=llm.generate(prompts,sampling_params)
returnoutputs
if__name__=="__main__":
#初始化vLLM推理引擎
model='/mnt/soft/models/qwen/Qwen2-72B-Instruct'#指定模型路径
#model="qwen/Qwen2-7B-Instruct"#指定模型名称,自动下载模型
tokenizer=None
#加载分词器后传入vLLM 模型,但不是必要的。
#tokenizer=AutoTokenizer.from_pretrained(model,use_fast=False)
text=["你好,帮我介绍一下什么时大语言模型。",
"可以给我将一个有趣的童话故事吗?"]
outputs = get_completion(text, model, tokenizer=tokenizer, max_tokens=512,temperature=1,top_p=1,max_model_len=2048)
#输出是一个包含 prompt、生成文本和其他信息的 RequestOutput 对象列表。
#打印输出。
foroutputinoutputs:
prompt=output.prompt
generated_text=output.outputs[0].text
print(f"Prompt:{prompt!r},Generatedtext:{generated_text!r}")
在终端执行python脚本,可以看到控制台是否正常输出 pythontest.py
6、启动服务 & 包装OpenAI格式的接口验证模型可用后,那么就可以通过vLLM提供的模块,将整个模型服务包装成OpenAI格式的HTTP服务,提供给上层应用使用。 需要注意的参数配置: --served-model-name指定服务模型的名称。--max-model-len指定模型的最大长度,如果不指定,那么会从模型配置文件中自动加载,QWen2-72B模型支持最大128K--tensor-parallel-size指定多个GPU服务运行,QWen2-72B的模型,单卡GPU无法支撑。--gpu-memory-utilization用于模型执行器的GPU内存分数,范围从0到1。例如,值为0.5意味着GPU内存利用率为50%。如果未指定,将使用默认值0.9。vllm通过此参数预分配了部分显存,避免模型在调用的时候频繁的申请显存。
关于vllm的更多参数,可以参考官方文档:https://docs.vllm.ai/en/stable/models/engine_args.html
这里可以使用tmux命令来进行服务的运行。 tmux(Terminal Multiplexer)是一个强大的终端复用器,可以让用户在一个终端窗口中同时使用多个会话。使用tmux可以提高工作效率,便于管理长期运行的任务和多任务操作
python3-mvllm.entrypoints.openai.api_server--model/mnt/torchv/models/Qwen2-72B-Instruct--served-model-nameQWen2-72B-Instruct--tensor-parallel-size8--gpu-memory-utilization0.7
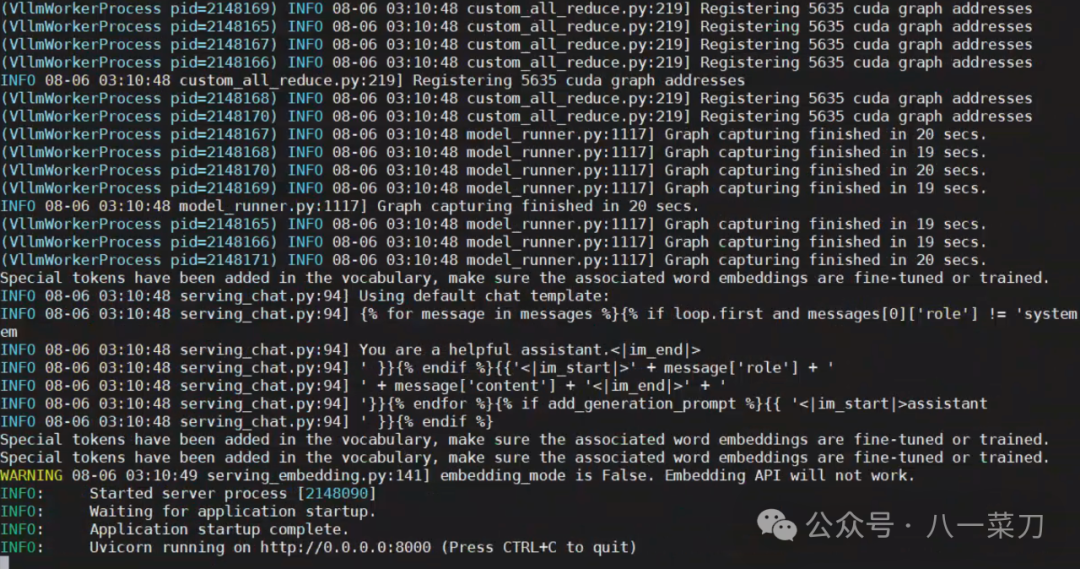
出现端口等信息则代表当前的模型服务启动成功!!! 启动成功后,可以通过命令nvidia-smi查看GPU显存使用情况 首先创建一个新会话 tmuxnew-tllm
进入会话 tmuxattach-tllm
启动命令: python-mxxx
退出当前会话 如果没反应就多试几次
英文输入下ctrl+b然后输入d
通过curl命令验证大模型OpenAI接口服务是否可用,脚本如下: curlhttp://localhost:8000/v1/chat/completions-H"Content-Type:application/json"-d'{
"model":"QWen2-72B-Instruct",
"messages":[
{
"role":"user",
"content":"给我讲一个童话故事"
}
],
"stream":true,
"temperature":0.9,
"top_p":0.7,
"top_k":20,
"max_tokens":512
}'
四、总结目前的开源生态已经非常成熟了,vLLM这样的工具能够轻松实现对大模型的快速部署,工作效率上大大提升! 怒赞? 五、References官网资源等信息| 资源 | 地址 |
|---|
| QWen | GitHub:https://github.com/QwenLM/Qwen
Huggingface:https://huggingface.co/Qwen
ModelScope:https://modelscope.cn/organization/qwen?tab=model
docs:https://qwen.readthedocs.io/zh-cn/latest/getting_started/quickstart.html# | | Pytorch | https://pytorch.org/get-started/locally/ | | Conda | https://www.anaconda.com | | vLLM | https://docs.vllm.ai/en/latest/getting_started/installation.html |
|
|
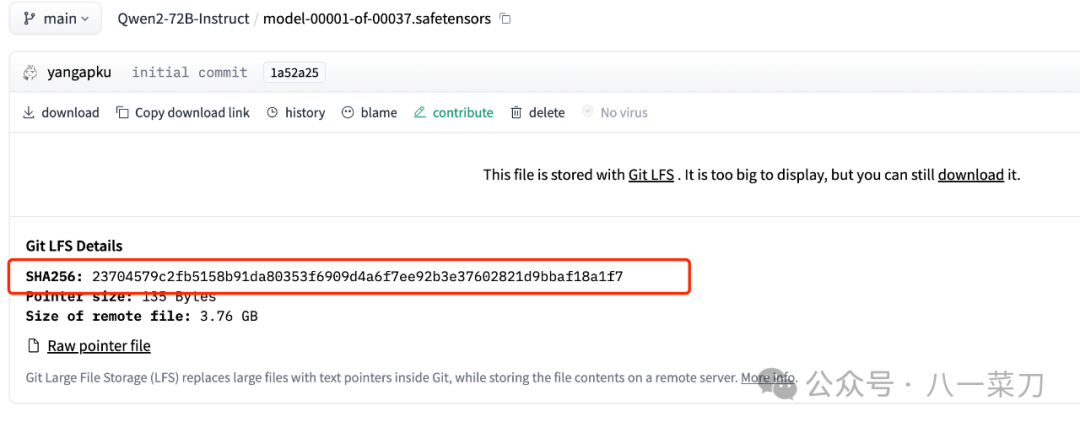
权重文件下载不完全在本次部署过程中,碰到了下载模型权重文件不完整的情况,导致通过vLLM部署不起来,可以通过Linux的命令sha256sum工具来对模型权重文件进行检查,对比网站上的模型权重文件的sha256是否一致,如果不一致,需要重新下载安装 命令如下: sha256sumyour_local_file
|